In 2016 I decided to build a server that I could use for my home network. First it was only a NAS. I experimented with
FreeNAS for a while but found the hardware support from the kernel to be abysmal. To be fair,
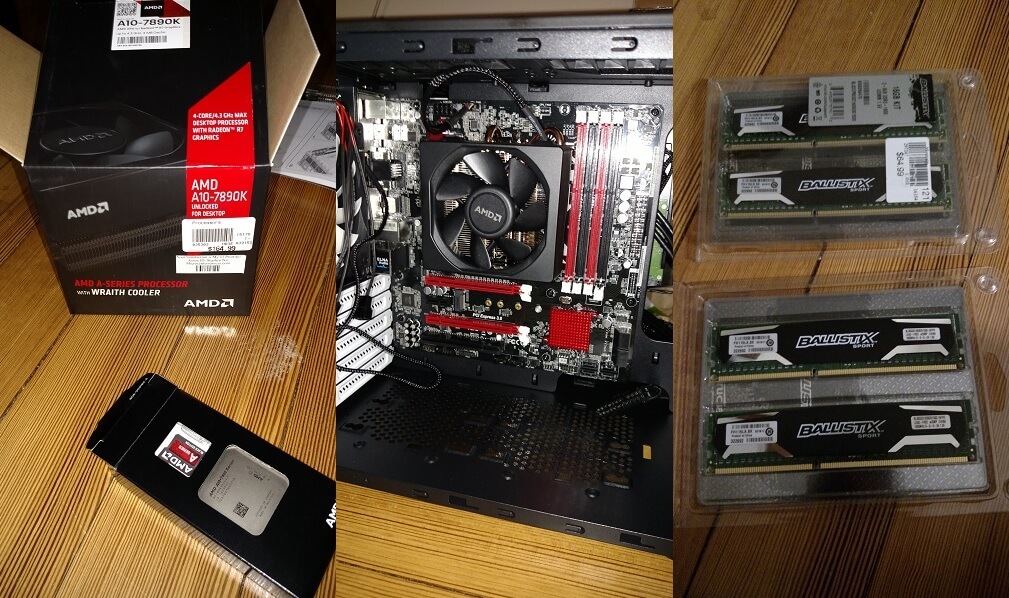
I was running with a pretty "budget" CPU and chipset: an AMD 7890K APU utilizing the old FM2+ socket. If you're not familiar with
AMD's pre-Zen era, know that it was pretty terrible. I had always planned to use ZFS from the beginning so I made sure to pump this
thing with 32 GB of (slow) DDR3.
So yes, other than the good amount of RAM the hardware generally sucked.
I got unlucky with one of the batches of RAM I got:
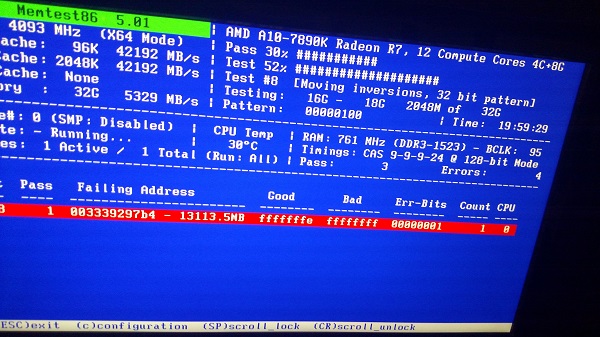
After a small delay of RMA'ing one of the 2x8GB kits I was back in business.
As I mentioned earlier, the hardware support for what I had with FreeBSD was terrible. I wasn't able to get a lot of my USB 3 ports recognized, and I had found overall system performance to be no match for an equivalent Linux setup when running through a lot of different benchmarks. I also missed having access to many of the community-maintained Docker images and didn't like the idea of having to run a VM on FreeBSD just to be able to use containers. I had been using FreeBSD jails up until this point which worked very well.
After some careful planning I moved the server over to Ubuntu and switched to ZoL (ZFS on Linux). I started containerizing a few workloads
that I had and set each one up to be managed through systemd. It looked something like this:
At some point a year or two later I ended up getting gigabit WAN service. I found that the consumer-class router I had could barely handle
the load when saturating the WAN link which was very disappointing. I'd often see my speeds throttled back. If my overall network had many
connections open across many devices and I tried to saturate the link things would look even worse. At times my router could only squeeze out about
600 Mbps for me. This was not okay, since I was paying for gigabit I expected to have gigabit. At this point I decided to turn my server into both
a router and a NAS. I grabbed an Intel 4-port PCIe NIC
and spent a good amount of time on learning how to set all this up and it took me a bit to configure netfilter correctly, especially since I was using Docker on this machine.
The chain that Docker creates really complicated things for me as I didn't understand how to work around it with what I was trying to do. In the end I was able to get
everything up and running:
I went with dnsmasq for my authoritative DHCP and DNS server as its lightweight and easy to configure:
Right away I found that many things were not working inside my LAN. Things that I had not explicitly blocked were being blocked. After some
investigation I found out that some sysctls were needed to prevent my netfilter rules from applying to my LAN:
While this worked it wasn't taking effect on reboots. This drove me nuts and it took me quite a while to find out what was going on here.
Turns out that some sysctls are ignored on boot due to timing issues.
This meant that I needed to put my own workaround in place to get these settings to stick across reboots. What a pain.
Many Linux distros are generally great at handling updates. It's not often that you need to restart the system compared to Windows where nearly every update I get seems to require a reboot. Still, I wanted less downtime since my server was now my primary gateway. At the time I worked with a Linux kernel dev which happened to work on Ksplice in his previous life. After talking with him about it for some time I decided to bring this kind of functionality into my server using Livepatch. Getting this in place was great as it cut my downtime to almost zero.
After a while I realized that I never set myself up for IPv6. I went back to the drawing board for configuring netfilter and dnsmasq and thought
it'd be relatively simple to get it working. It ended up being a much bigger pain than I anticipated for a few reasons. Fist, I was pretty new
to IPv6 and needed some time to understand the differences. Hint: it's not nearly as straightforward as it seems and there are a lot of things
that you need to take into account when setting it up. Second, it took me a while to get the netfilter config perfect as I initially blocked
too much and ended up breaking my any DHCPv6 queries from my ISP. Third, I needed to learn about prefix delegation and setup my DHCP server in
a very specific way to request a very specific prefix from my ISP using certain settings. Without this being perfect I wasn't able to get an IPv6
address from my ISP. This took me hours and hours to understand and get right. Fourth, since there is no NAT with IPv6 I was very worried about
getting my netfilter rules correct. Initially it was not clear to me if I was blocking enough from the WAN or if I was blocking too much that may
end up breaking other things. Finally, after many hours and late nights I got it all setup and working:
I needed a few extra sysctls as well:
Now that I had made myself a pretty nice router with the server I already had I could ditch my old, junky consumer-grade router. There was one more thing I wanted to do before I considered this project done and that was getting this site (and a few other things) hosted on it. This was pretty straightforward and I ended up containerizing everything. I use Google Domains which supports dynamic DNS so I needed to get something setup on my server to continually update my DHCP IP that my ISP gives me. I found ddclient to be very well supported and to work very well so I stuck with that.
After getting that in place I wanted to make sure that I used as little bandwidth as possible so I ended up going with the PageSpeed module for Nginx. I still use this as of today as it does an amazing job at dynamically optimizing things on the fly, handles applying aggressive caching, and handles invalidating cached items when required. View the source of this site and right away you'll see PageSpeed in action. If you look at the headers you'll see some of the nice caching and compression that it sets up as well.
After spending more hours than I can remember on getting to this point I ended up sticking with this setup for years. I was able to squeeze a lot out of what I had until the very end. I went through a few light optimization phases but I was always a bit amazed how far I could make the hardware I had go with a little extra work here and there. Though I don't talk about how I have it setup much here (needs another article), ZFS is and has always been very solid for me. Its provided me with great performance and redudancy for the last four years. I've never had it break on me, corrupt my data, or crash the kernel. I felt this was significant to mention since ZFS on Linux is not yet 1.0. I consider using a filesystem that's not yet 1.0 a big risk.
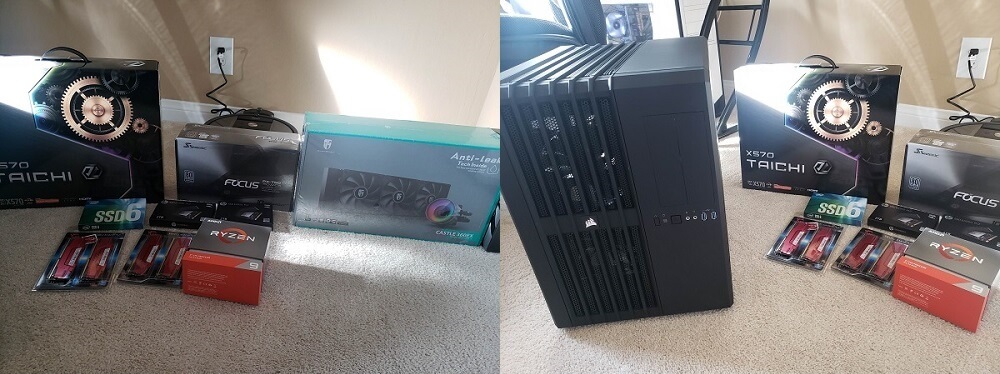
Fast forward to early 2020. I find my workstation I built back in 2013 for gaming, development, and various media workloads to be on its last legs.
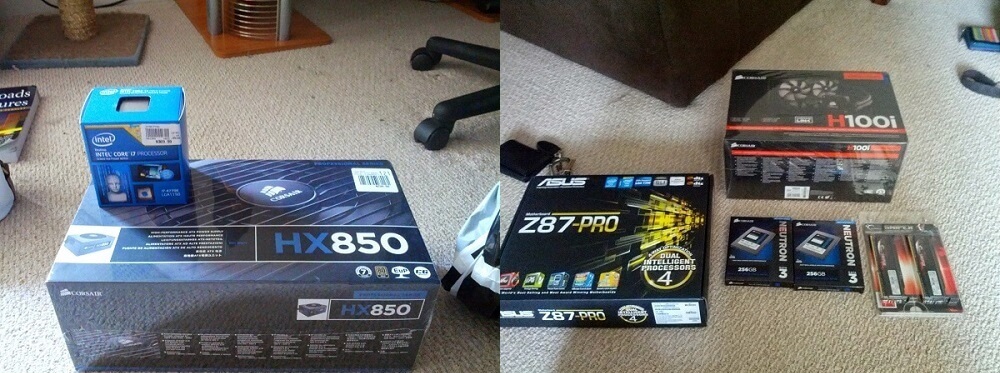
I had built this machine with a i7 4770K (Haswell), 16 GB DDR3, a Z87 chipset, and some fancy (at the time) SATA SSDs:
I had the chip overclocked from 3.5 GHz to 4.5 GHz on water for years but found that my water cooler was starting to perform very poorly so I had to remove the overclock.
Aside from that, it wasn't able to keep up with modern workloads very well at either frequency, and some of the newer games that had come out were too
much for it to handle at higher frame rates as I run an ultrawide monitor with a high refresh rate. My upgrade paths started to become dead
ends since I had no support for things like M.2, DDR4, or PCIe 4.0. I had been eying AMD's new 7nm Zen 2 chips for a while (with much excitement)
and decided to get their flagship chip, the 3950x. It took me many months to be able to grab one of these since they kept selling out within minutes
every time they'd come back in stock. I wanted to future proof this build as much as I could so I waited for sales on the various components
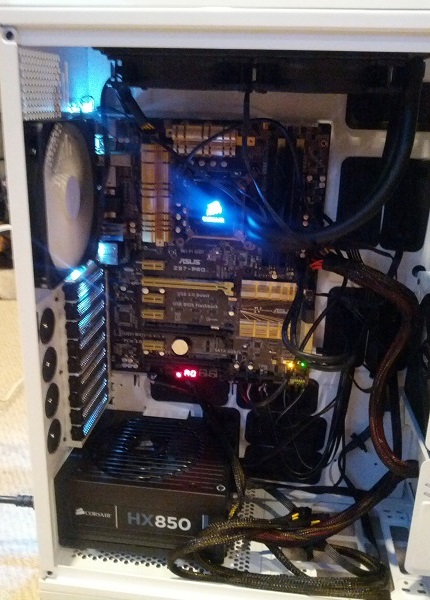
I was eying and grabbed things as I could. I ended up going with the X570 chipset, 64 GB of fast DDR4, water cooling (again, but this time
something much more potent), and a bunch of PCIe SSDs:
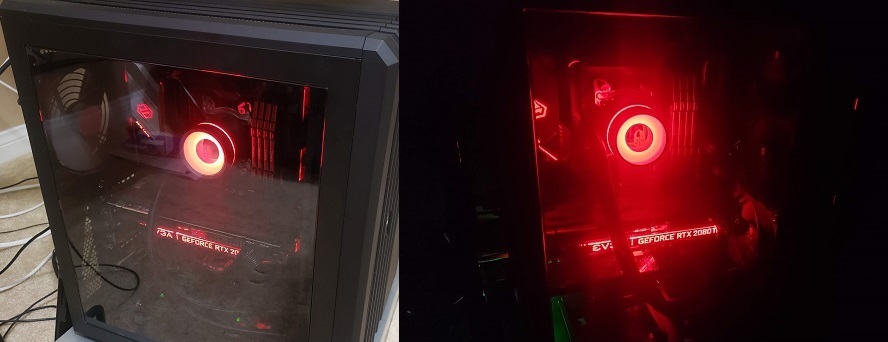
As you can probably imagine, the CPU in my server was barely able to keep up with everything I wanted out of my server, even before this point. After giving it three major workloads on top of some super nice monitoring I set up plus some heavy compute tasks I have (more on that in another article) I decided that I should somehow try and consolidate everything I have into my new Zen 2 workstation. After all, the 3950x has 16 physical cores, 32 threads, and boosts to 4.7 GHz. More impressively, it consumes a surprisingly low amount of power considering the crazy amount of compute power the chip provides. I can now say firsthand that the benefits of moving to a 7nm chip are real, especially if you're coming from older tech. On top of this, I had extra RAM and I/O to spare. The only challenge was figuring out what to do with all of my spinning disks where ZFS was taking care of all the important stuff. This is where things started to get really fun.
I've always used Windows on my workstation, mostly for gaming. This was a problem as there was no way I was moving away from ZFS or Linux. I had two options here: run Linux as the host (and a type 1 hypervisor) and passthrough my GPU to a Windows guest, or run Windows as the host and turn all of my Linux stuff into VMs via Hyper-V. The forcing function for me to pick one over the other was that I had no more PCIe slots that I could use, and if I went with Linux as the host I would either have to get a second GPU to use while my main GPU is passed through to the host, or I'd have to work with it in a remote manner. I also found out that people were having trouble getting a 2080 Ti passed through. I'm not so sure this would have been a problem with a proper setup (IOMMU groupings, etc.) but I really didn't want to deal with losing the GPU to the host when it's passed through to the guest. For these reasons I ended up going with Windows on the host as I normally have it. I thought it would be quick and easy to get this going, but I was wrong.
I thought I'd be able to stick with Windows 10 Pro but I quickly found out that it does not support discreet device assignment (DDA). This is a deal breaker since DDA is required to pass through PCIe devices. I found no way of installing Windows 10 as a type 1 hypervisor, enabling Hyper-V in Windows 10 seemed to operate as a standard type 2 hypervisor. Now what?
After some research and experimentation I decided that using Windows Server as my host should fulfill all of my requirements. This was a bit of a pain in the beginning (hours of extra work) as I had a tough time getting some of my drivers installed correctly without having to disable secure boot and load unsigned/modified drivers. Once I got all the drivers in place and tuned the OS a bit to get my gaming environment the same as it was before it was time to move onto creating the Linux VMs to replace my old server.
The very first thing I needed to migrate was my gateway. Setting up the Linux VM was straightforward, but how was I going to get this thing to control my entire network?
I decided to forgo using virtualized NICs with SRV-IO and just pass the entire NIC
in directly. I had no plans for the host to use this NIC and, to be honest, I didn't want the host to even see this NIC. The less access the host has to the NIC the better,
even if that meant ditching virtualizing it. Passing through the NIC was incredibly easy:
Now my host didn't need a network cable anymore. Previous it was connected to this same NIC when the NIC was in my now-retired server. All that was needed was to create an internal
vSwitch, attach one end to the VM, and attach the other end to my host:

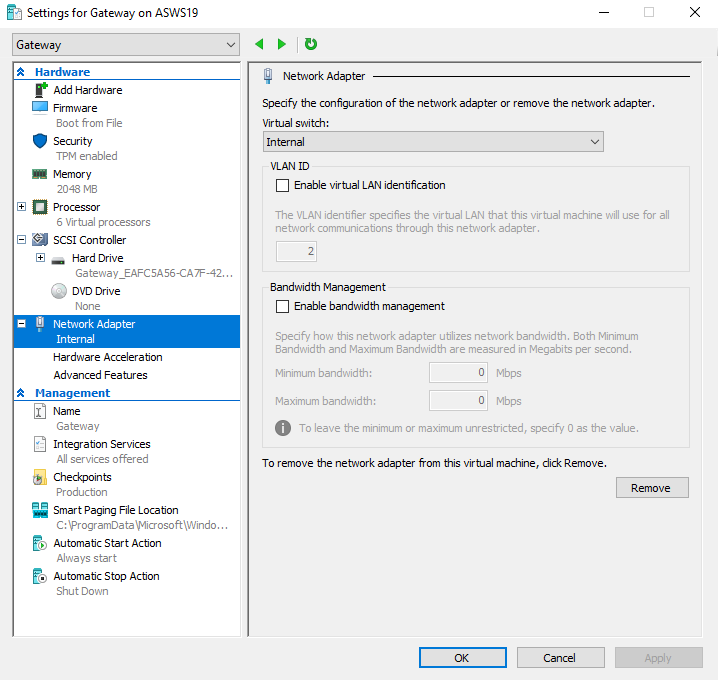
After this point pretty much everything was the same except for a few small quirks. MAC address spoofing needed to be enabled on this VM for everything to work 100% correctly.
I also wanted secure boot (UEFI, no legacy BIOS booting) enabled and working (this applied to all my VMs) which took a few bits of extra work. Lastly, I wanted to expose my CPU's firmware-based
TPM capabilities (again, applied to all of my VMs) which added, again, just a bit more work. Here's how everything looked after
getting the gateway setup:
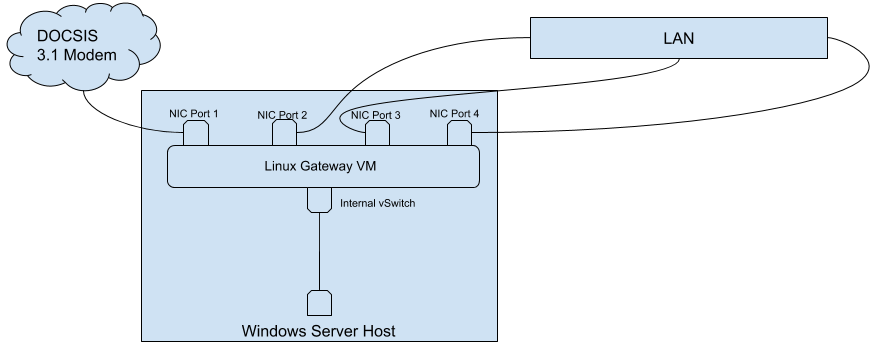
You'll notice a pattern here: anything external to the workstation is connected to my physical NIC inside of the workstation for LAN/WAN access. Anything internal to the
workstation (including the workstation itself) is attached to the vSwitch for LAN/WAN access.
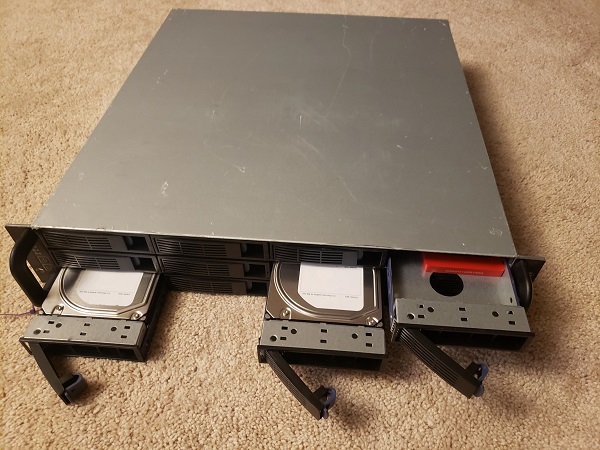
My awesome boss at the time gave me his old JBOD enclosure which was a Norco (no idea of the model) with a
ARC-8026 inside. This was a godsend as this solved a huge problem for me when moving
to this new setup.
All I needed to do was get an HBA card into my new workstation build. I decided on going with
this SAS 3008 card as it was very well supported by
Linux and also provided a bit of future proofing for me.
Before throwing the HBA into my workstation I wanted to make sure the firmware was up to date as it came with an extremely old version. As I was updating the firmware
failed halfway through. This can be fatal on other devices but thankfully HBAs seem to be pretty hard to brick. The problem was that I used generic firmware from Broadcom
to do the initial upgrade. I didn't realize that this wouldn't work and would cause a failure when writing out one of the blocks to the card. Now the only problem was
finding the specific Dell-provided firmware. I couldn't find it anywhere, and I had searched for hours and hours. Finally around 4am I found out
that the firmware I needed was buried inside one of Dell's .exe files that you can get to try and flash the card from within Windows. After extracting the firmware out of
the .exe I was finally able to update the card successfully:

ZFS expects direct hardware access to the devices it manages. There was no better way to accomplish this other than passing through the HBA card to the VM. I used almost the same exact commands that I did to pass through the NIC to the gateway VM to passthrough the HBA card to this VM. Similar to what I did with my host, I added a virtual network adapter to this VM that attached to my vSwitch so it could be part of my LAN. After that it was only a matter of getting my zpool setup using the disks accessible via the HBA.
Another route I could have taken would have been to pass through the individual disks using Hyper-V, but after a lot of research this seemed to carry a significant amount of risk since it effectively blinds ZFS to parts of the hardware (this is a bigger topic with many intricate details). This was definitely not an option for my setup.
My last VM was very simple to setup as it mostly contained my Nginx reverse proxy setup that I had on my old server from before. There are a few applications/services that sit behind this, some public facing, some not, but all are over TLS. Again, this VM was given a virtual network adapter connected to my vSwitch for LAN/WAN access.
While I refined my monitoring and resouce allocation for a while afterwards I was mostly done. I'm leaving out some of the later work that was done for other articles:
The best part? Doing all this and not ever noticing the hit on my host, even when running very demanding games or hammering the CPU with any of the development I do. Of course having a huge glob of RAM to work with and really nice PCIe SSDs makes a massive difference so it's not purely the CPU that enabled me here. Consolidating everything has helped me save on space, failure domains, and power consumption as well. The new 7nm chips are surprisingly efficient under most workloads. Huge kudos to AMD to pushing the CPU market forward in the past few years. All the work that has gone into Zen, especially Zen 2 using the 7nm process, is really amazing.